Serve WebP images in Next.js with next-optimized-images
Image sizes and formats play a huge role in website performance. Sites containing unnecessary large images result in a large bandwith usage for our users and affect loading times of the overall site and SEO. Therefore, we want to take a look at an amazing way to create optimized images in our Next.js applications with the help of next-optimized-images.

Image sizes and formats play a huge role in website performance. Sites containing unnecessary large images result in a large bandwith usage for our users and affect loading times of the overall site and SEO. Therefore, we want to take a look at an amazing way to create optimized images in our Next.js applications with the help of next-optimized-images
Not all images are created equal
One of the main factors coming into play when we want to optimize an image for the web is the actual file type.
Amongst the numerous types of images there are a few ones which we commonly encounter on modern web pages:
-
PNG: A widely supported image format providing efficient lossless or lossy compression with alpha transparency support.
-
JPEG: Lossy compression image format, which is currently most widely used and is well suited for photographs. However, it being lossy can produce unsatisfactory results on graphics containing diagrams and text.
-
SVG: In contrast to other formats, SVG (Scalable Vector Graphics) is based on vectors. Files of this type describe the content by a set of commands like lines, areas, shapes and colors which are to be drawn on the screen. As a result SVGs are optimal for graphics based on a few elements and produce scalable results in perfect quality.
-
WebP image: The new kid on the block! WebP (Web Picture format) supports both lossy and lossless compression. Images of this format are typically 25-35% smaller than their JPEG and 26% smaller than their PNG counterparts. However, support on older browsers is limitied.
Wouldn't it be nice, if we had a possibility to serve WebP images in cases where the client is able to handle them and fall back to the PNG and JPEG formats otherwise? This is one of the things we will achieve with next-optimized-images.
Use next-optimized-images to generate WebP images
We will walk through the process with a simple example. We have a simple next.js app, which displays an image (saved in the PNG format):
// index.js
import styles from '../styles/Home.module.css'

export default function Home() {
  return (
    <div className={styles.container}>
      <h1>Image Optimization</h1>
      <div style={{ width: '1000px', height: '667px' }}>
        <img src="/harley.png" style={{ objectFit: 'cover' }} />
      </div>
    </div>
  )
}
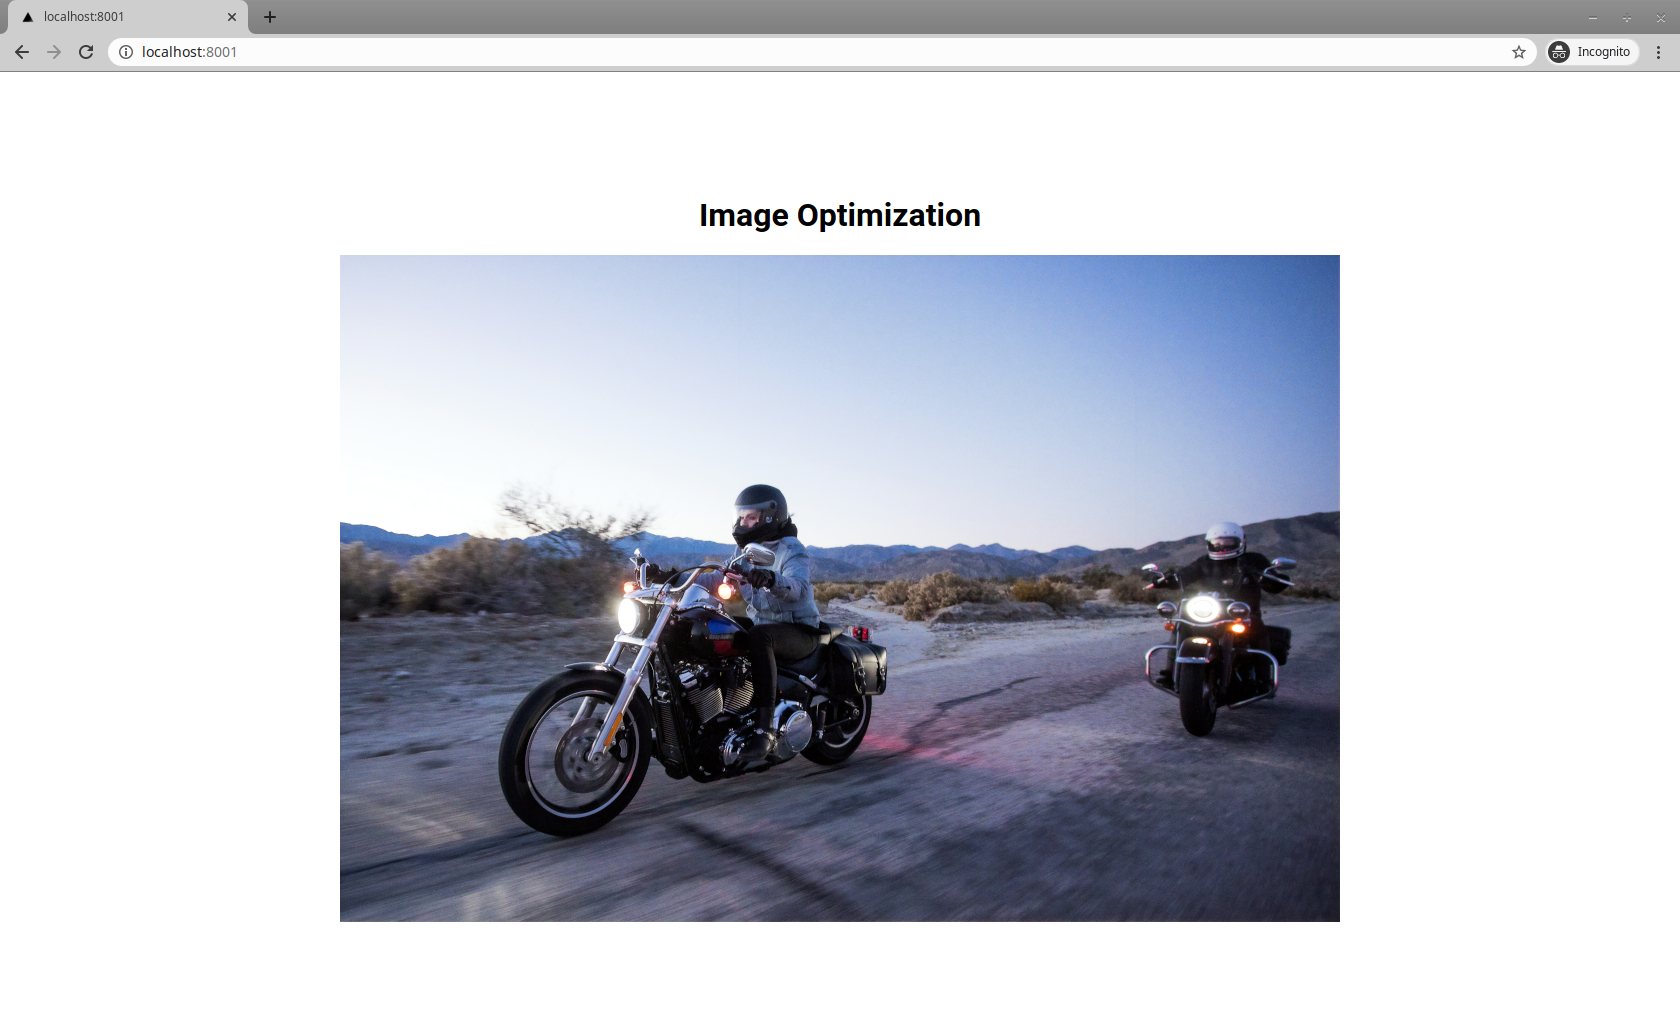
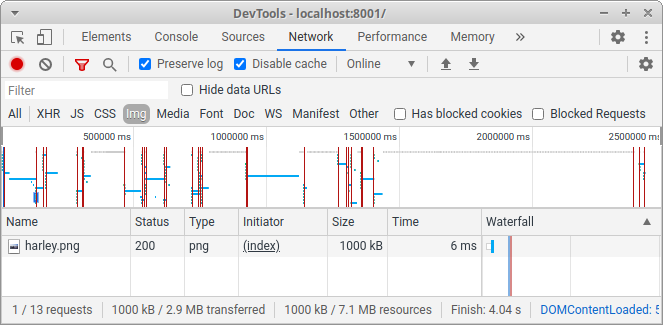
However, displaying this one PNG image, costs us 1000 kB of network traffic!
Let's see what we can do about that.
Setup
To automatically convert and serve images in the webp format, we need to install two libraries:
next-optimized-images which allows us to easily convert images by adding queryparamters to the src.
webp-loader, an optimization package used to convert JPEG/PNG images into webp.
npm install next-optimized-images webp-loader
With these two libraries installed, let's tell next.js to use next-optimized-images via the next.config.js file.
// next.config.js
const withOptimizedImages = require('next-optimized-images')

module.exports = withOptimizedImages({})
And... we're ready to go.
Using WebP for our images
As previously discussed, we would like to serve our images in the webp format for clients supporting this format and flal back to either jpeg or png in other cases. Luckily we don't need to manually convert all our images, but can instead use next-optimized-images's webp flag:
// index.js
import styles from '../styles/Home.module.css'

export default function Home() {
  return (
    <div className={styles.container}>
      <h1>Image Optimization</h1>
      <div style={{ width: '1000px', height: '667px' }}>
        <picture style={{ objectFit: 'cover' }}>
          <source
            srcSet={require('../public/harley.png?webp')}
            type="image/webp"
          />
          <img src="/harley.png" />
        </picture>
      </div>
    </div>
  )
}
When viewed in a web browser our site still looks exactly the same. However, a lot has changed when we have a look at the network tab!
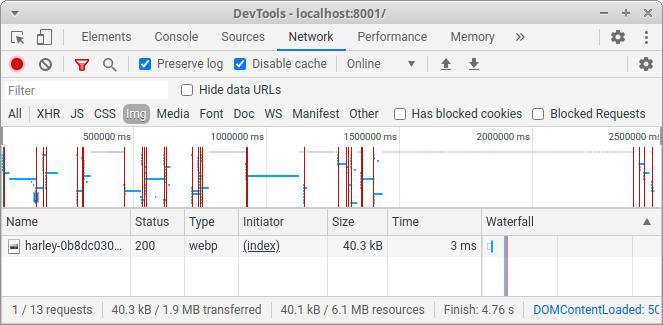
Perfect! Using WebP brought the network traffic for our image down to only 4% from the initial 1000 kB